Welcome to my blog on how to install New Relic in an OpenLitespeed server in RunCloud and connect it to a Wordpress site. New Relic is a powerful tool for monitoring and optimizing the performance of web applications, and its integration with OpenLitespeed and RunCloud allows for easy management and monitoring of your Wordpress site.
As a website owner, administrator, or developer, monitoring the performance of your WordPress site is crucial to ensure that your visitors have a positive experience. With the increasing complexity of websites and the demand for faster page load times, monitoring performance has become more important than ever. This is where New Relic comes in.
New Relic is a performance monitoring tool that provides real-time visibility into the performance of your web applications, including your WordPress site. It offers detailed insights into the performance of your site, including the response time of your pages, the number of requests per minute, and more. By using New Relic with your WordPress site, you can quickly identify and resolve performance issues, ensuring that your site provides a fast and seamless experience for your visitors.
In this article, we will explore what New Relic is, how it works, and why it's an essential tool for anyone who wants to optimize the performance of their WordPress site. From improving page load times to identifying performance bottlenecks, we will explore the key benefits of using New Relic with WordPress and show you how to get started with this powerful tool.
You can refer to the official RunCloud blog here : How To Install New Relic Monitoring on RunCloud
Introduction
In this blog post, we will go over the steps to install and configure New Relic in an OpenLitespeed server in RunCloud, and how to connect it to your Wordpress site. We will also discuss some best practices and tips for using New Relic to optimize the performance of your Wordpress site.
Whether you are a web developer looking to improve the performance of your Wordpress site, or a business owner looking to monitor and optimize your online presence, this blog post will provide valuable information and guidance on how to use New Relic with OpenLitespeed and RunCloud. So let's get started!
How to install New Relic in OpenLitespeed?
As RunCloud user, One thing I would love to be implemented is monitoring tools like new relic. Most of the OLS customers find it hard to install new relic on OLS server. I hope this will help them :) Hey, I know I'm too bad with words 😁 Let's not waste no more.
Step 1
First, we need to create a account with new relic. Refer : here
Once account is ready, you can login to their dashboard. It may look like below
Now, you need to click on APM then Add more data.
It's a good idea to copy your API key during this period.
Once the key is copied and saved to a notepad, click on "Begin Installation". This will open up multiple installation options, choose Guided Install.
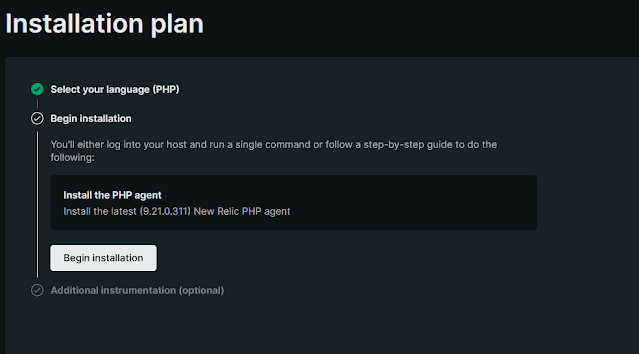
Now, we need to choose PHP since we are adding wordpress application.
Now click on Begin Installation.
You need to choose APT(Package manager) for PHP agent installation.
This will open up below options.
Enter your web application name and once you choose apt, it will give you a list of commands that you can run inside your server,
Step 2
Run the following commands to configure and install the agent. Configure the New Relic apt repository (you only need to do this once per system):
echo 'deb http://apt.newrelic.com/debian/ newrelic non-free' | sudo tee /etc/apt/sources.list.d/newrelic.listTrust the New Relic GPG key:
wget -O- https://download.newrelic.com/548C16BF.gpg | sudo apt-key add -
Update the local package list:
sudo apt-get update
Start installing the PHP agent:
sudo apt-get -y install newrelic-php5
After 4th command, we need to set environment variable.
export NR_INSTALL_PATH=/usr/local/lsws/lsphp74/bin
newrelic-installStep 3
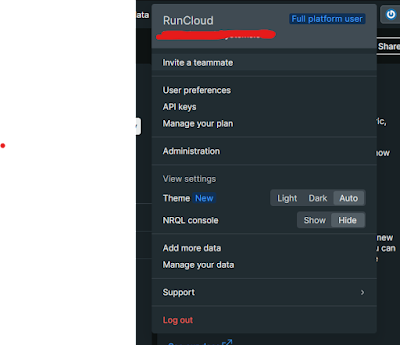
You can copy paste your key by clicking on power icon in top right corner, this will give us belowChoose API key.
Step 4
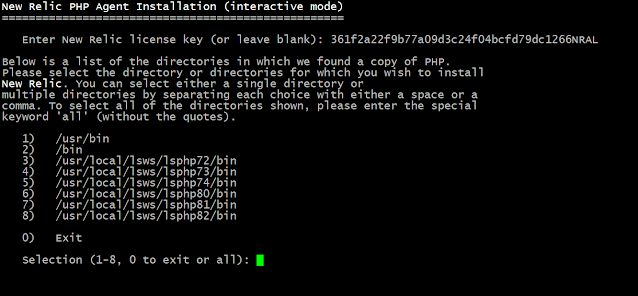
Copy the license key. Now, you can input the same in your terminal.
If you have previously given link as /usr/local/lsws/lsphp7*/bin etc then it will give PHP path for all versions, then you can type "all" to select all versions.
Here is the screenshot for wildcard option.
sudo NR_INSTALL_SILENT=1 newrelic-install installImportant, instead of the given command in new relic
sed -i -e "s/REPLACE_WITH_REAL_KEY/361f2a22f9b77a09d3c24f04bcfd79dc1266NRAL/" \
 -e "s/newrelic.appname[[:space:]]=[[:space:]].*/newrelic.appname=\"app-brakus\"/" \
 -e '$anewrelic.distributed_tracing_enabled=true' \
 $(php -r "echo(PHP_CONFIG_FILE_SCAN_DIR);")/newrelic.ini
We need to use the following command, Please note the key and other values may differ. Please make sure to use "/usr/local/lsws/lsphp74/bin/php" or another lsphp full path.
sed -i -e "s/REPLACE_WITH_REAL_KEY/361f2a22f9b77a09d3c24f04bcfd79dc1266NRAL/" \
-e "s/newrelic.appname[[:space:]]=[[:space:]].*/newrelic.appname=\"app-brakus\"/" \
$(/usr/local/lsws/lsphp74/bin/php -r "echo(PHP_CONFIG_FILE_SCAN_DIR);")/newrelic.ini
Also, inorder to monitor server main logs you need to run the below command as well.
curl -Ls https://download.newrelic.com/install/newrelic-cli/scripts/install.sh | bash && sudo NEW_RELIC_API_KEY=NRAK-N4L14Z7T8426FR9T38YUQZ5K63R NEW_RELIC_ACCOUNT_ID=3486299 /usr/local/bin/newrelic install -n logs-integration
Once run above command, you will see below result
Step 5
Now, we need to make sure that the service is restarted. As we are running lsphp, we may need to kill the process to get new changes.systemctl restart lsws-rckillall lsphpStep 6
Please make sure the license copy is updated in /usr/local/lsws/lsphp74/etc/php/7.4/mods-available/newrelic.iniAs you can see we get monitoring data from server.
Now, we have added the new relic on your run cloud server. We will add another post to guide you regarding further wordpress monitoring.
Conclusion
In conclusion, installing New Relic in an OpenLitespeed server in RunCloud and connecting it to a Wordpress site is a simple process that can provide valuable insights into the performance of your website. By following the steps outlined in this article, you can easily set up and configure New Relic in your server and start monitoring your website's performance. With the detailed information provided by New Relic, you can identify and address any potential issues with your website, ensuring that it runs smoothly and efficiently for your visitors.


terima kasih
ReplyDelete